2013年4月11日 星期四
« 黑桃皇后 » / 普希金 (Пиковая дама / А. Пушкин)
« 黑桃皇后 » 是普希金1833年的作品。普氏從好友納裘金(Нащекин)那兒聽聞,當時叱吒上流社會的葛麗恣娜公主(Галицина)有位孫子,曾經賭牌輸掉家產,經由祖母秘密傳授三張密牌,最後又贏回自己的財產。
普希金善用真人真事,賦予神祕的色彩,導入引人入勝的情結,在短短的章節中令讀者留下深刻的印象。
文章不會太冗長,情節又非常緊湊。對於俄文初學者,如果想一探俄國現代文學之父簡潔精鍊的文筆,« 黑桃皇后 »是一篇不錯的選擇。
[ 下載_rtf ] (俄文 52 kb)
如何在手機/平板閱讀
2013年4月9日 星期二
手機/平板(android系統)安裝『俄漢字典』看原文小說(ePub檔)
賞讀原文小說,除了可以欣賞文學作品,還可以品味作者運用文字的功力與奧妙。但是對於語言初學者,頻頻翻閱字典,必會讓你的興致大打折扣,敗興而歸。
當然,我們可以利用瀏覽器提供的外掛程式或內部字典,在電腦上或筆電上瀏覽,讓閱讀原文小說變得輕鬆愉快。但是在現在的年代裡,手機和平板當道,沒有理由不裝備身邊的手機或平板,讓自身可以隨時隨地利用手邊輕巧的行動裝置輕鬆閱讀。
拿iPhone來說,點擊 iBook (右上角),從書架中選擇一本要看的書籍:
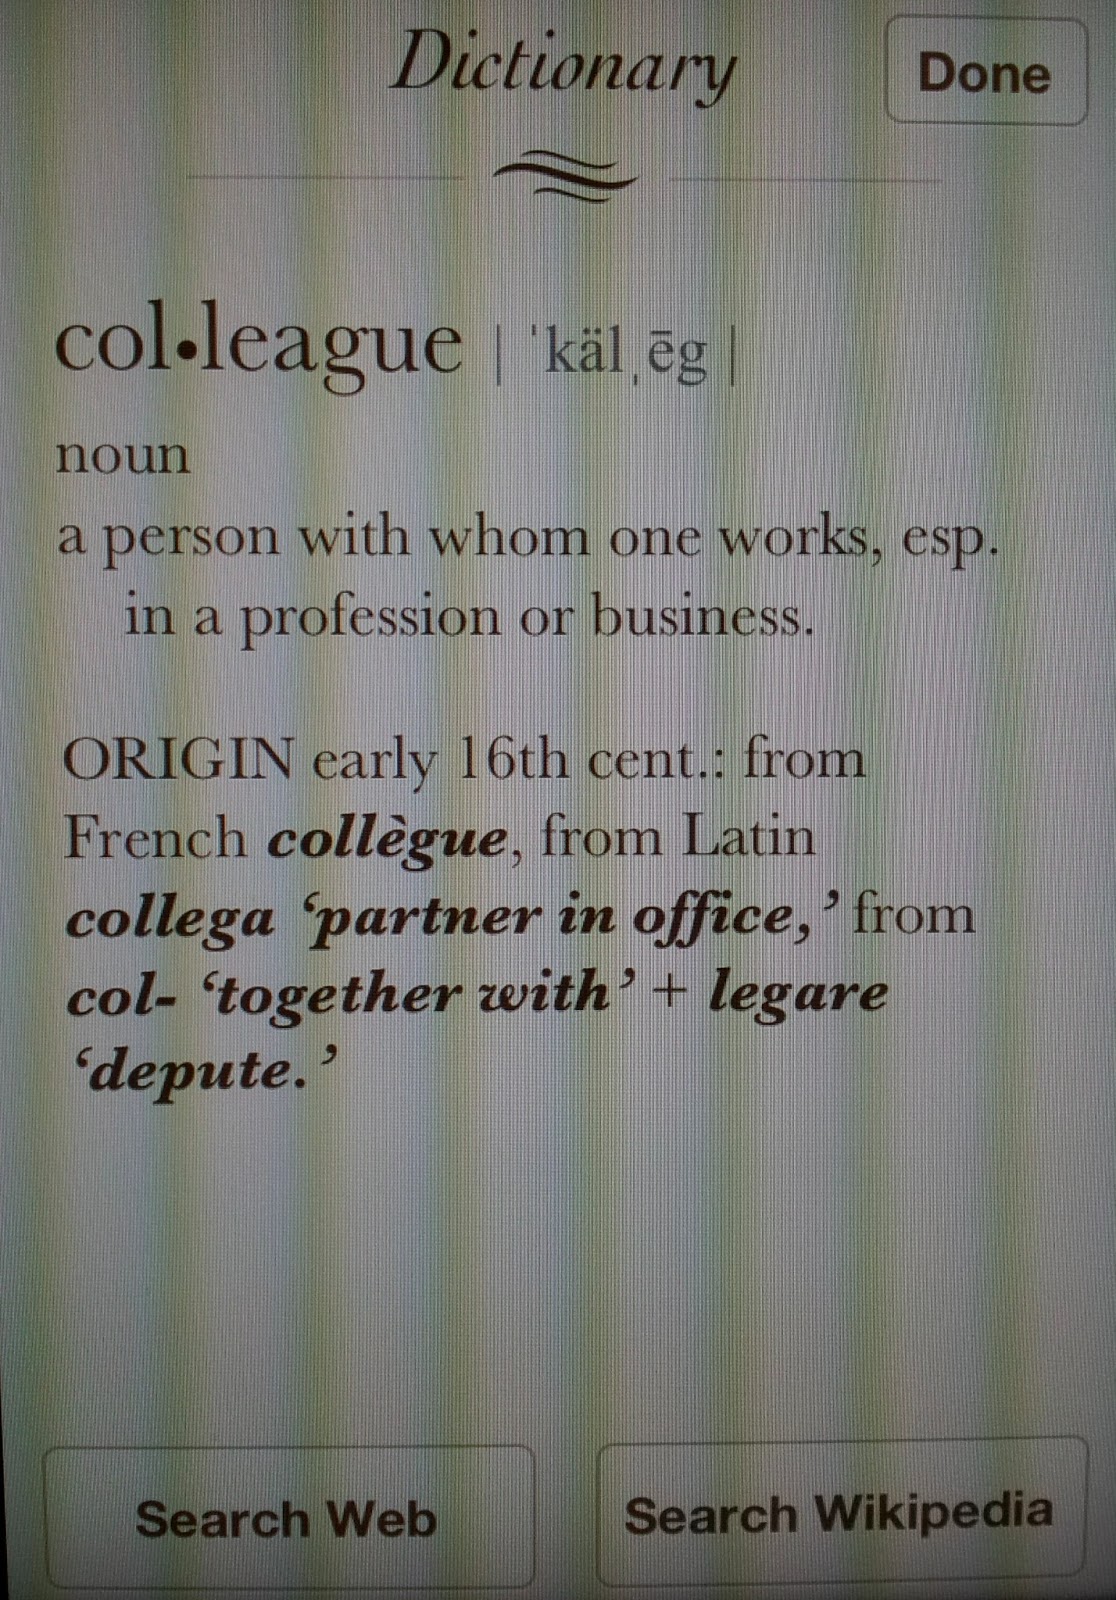
假設文章中的 "colleagues" 一字不甚明瞭,你便可以點它一下,然後再按下"Define"(定義),它的意思便如下圖一樣會顯現出來:
我自己的 iPad (iOS 5.1.1)裝了英漢字典,對於英文作品查閱生字幫助很大。有興趣的話可以參閱:安裝英漢字典。
言歸正傳,今天要談的是在 HTC, Sonny, Samsung... (Android 系統)的行動裝置上,安裝俄漢字典,讓讀者閱讀作品時,碰上不懂的字彙,可以直接按下,如同 iPhone 裡 iBook 的功能,讓其意思馬上顯現出來,免去查閱實體字典的麻煩;也不需要暫時跳出閱讀器,進入某個字典app,再返回閱讀器,增加手指間的勞動。
1)準備動作:請到 『Play 商店』下載兩個 Apps -- (a) FBReader ; (b) ColorDict .
FBReader 是電子書閱讀器,支援主流的電子書格式,例如: epub (ver. 2), fb2, html, plain text, mobi, rtf, doc. 詳細格式請參考:格式。
ColorDict 是一本安裝在行動裝置上的字典。下載後,其本身只提供了1至3本的英英字典。但它真正的威力是在於,使用者可以自行加入網路上找到的字典檔,根據個人的需求,自定擴充為最適合讀者的詞典工具。
下載,安裝妥當後,如果您的畫面會出現兩個圖示:
第一步已完成。
2)下載字典檔。
下方連結提供了八本字典。每本字典皆有三個檔,請務必三個檔都下載,才能順利安裝。讀者可以根據自己的需求選擇要下載的字典量,如果您覺得有英俄、俄英字典也不錯,又不嫌麻煩,那就全部下載吧!畢竟 ColorDict 並無限制您安裝字典的數量。
a. 一典通俄漢詞典
b. 華俄大辭典
c. Russian-English (Babylon) (俄英)
d. Edic Russian-English (俄英)
e. English-Russian (Babylon) (英俄)
f. English_Russian Mueller24 (英俄)
g. Lingvo Universal Eng Rus (英俄)
h. Dahl's Russian Dictionary (達利俄俄字典。對十八、十九世紀作品有助益。)
[下載]
請下載於電腦裡,不需要分別做匣子存放。將下載的全部檔案存放於同一個匣子(如果您八本字典都下載,就應該有24個檔!!!),等稍後存入手機或平板電腦。
3) 將字典檔存入手機或平板。
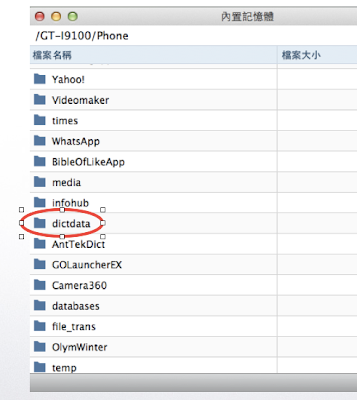
如同儲存音樂檔到手機/平板的方式,以傳輸線連接手機/平板與電腦。將剛才下載暫存在電腦的字典檔,存入手機/平板的 "datadict" 目錄下:
字典檔案存入"datadict"資料夾後,請打開手機/平板上的 ColorDict.app。它會開始安裝所有灌入的字典。(如果有任何一本字典在安裝上發生問題,只要移除掉那一本 [3個檔] 便可解決。)
打開 ColorDict,檢查一下字典是否安裝妥當。按下右上角的的資料夾圖示,所有字典皆顯示於此:
所有字典:(圖裡不只有俄文字典,我還安裝了其他的字典。)右側的向上箭頭,讓使用者可以根據自己常用的字典,調整先後的位置。
4)在電子書閱讀器上使用字典。
首先,下載一本俄文作品電子書來測試一下。[罪與罰]
下載完杜思妥也夫斯基的『罪與罰』,請存放入手機/平板 (可透過郵件寄送,然後在手機/平板裡打開)。
接著打開手機/平板上的 FBReader.app 電子書閱讀器,找到剛才放入的『罪與罰』(在此省略過程)。您便可以開始閱讀了!
"пожалуй" 一字解釋出現了...
當然,如果其他的字典裡也偵測到同一個字。它們也會同時顯現。以 "устроить" 一字為例:
要注意的是,因為俄語字彙的字尾常會有所變化,字典本身無法偵測所有的字尾變化,因此有時會被告知『找不到資訊!』。不要急!只要自行去掉字尾的變化,字典們將會列舉可能的選項!
基本上,我們已經大功告成,讀者們(俄文同學們)已經擁有了字典工具,可以與 iPhone 的功能相媲美,開始欣賞俄文作品了。
下一個問題是:哪裡有俄文作品電子檔呢?
當然,這是最貼切、急迫的問題。一是收集網路上的資料,二是自行製作電子檔。我與我的同僚將以此為使命,提供有志者一起完成俄羅斯文學之路!請拭目以待!
2013年1月23日 星期三
iOS -- Segue 傳入
使用 SEGUE 輸出與輸入資料
e.g. RootViewController 是一TableViewController,將Cell的值傳入DetailViewController。然後,在DetailVC 的TextView編輯好的資料,在回傳入RootViewController上頭的Cell,改變Cell 的值.
++++++++++++++++++++++++++++++++++++++++++++++++++++++++++++++
RootViewContrller.h 裡要設一 NSDictionary *returnSelection; 來接收回傳的值
RootViewController.m:
+++++++++++++++++++++++++++++++++++++++
DetailViewContoller.h 要設 id delegate;
//回傳到root:
*******************************************************
********************************************************
Xcode 的樣板
這裡的 data 只是單存的 array:
e.g. RootViewController 是一TableViewController,將Cell的值傳入DetailViewController。然後,在DetailVC 的TextView編輯好的資料,在回傳入RootViewController上頭的Cell,改變Cell 的值.
++++++++++++++++++++++++++++++++++++++++++++++++++++++++++++++
RootViewContrller.h 裡要設一 NSDictionary *returnSelection; 來接收回傳的值
RootViewController.m:
//傳資料到DetailController
- (void) prepareForSegue:(UIStoryboardSegue *)segue sender:(id)sender {
UIViewController *destination = segue.destinationViewController;//將segue的目的控制器指定給destination
//第一個if是回傳時用的
if ([destination respondsToSelector:@selector(setDelegate:)]) { //如果對setDelegate:方法有反應,便將自己存成value,設key為delegate
[destination setValue:self forKey:@"delegate"];
}
//第二個if是傳出用的
if ([destination respondsToSelector:@selector(setMySelection:)]) {//如果對setSelection:方法有反應,請準備處理選擇後的值
//prepare selection info
NSIndexPath *indexPath = [self.table indexPathForCell:sender];//將選擇的行列指定給indexPath
id object = [self.arr objectAtIndex:indexPath.row];//取出入徑索引的物件,指定予object
NSDictionary *mySelection = [NSDictionary dictionaryWithObjectsAndKeys:indexPath, @"indexPath", object, @"object", nil]; //將其入徑索引和物件存入到一個dictionary
[destination setValue:mySelection forKey:@"mySelection"];//設定下一個控制器的KVC
}
}
//Setter: 取得來自DetailController的回傳delegate
- (void) setReturnSelection:(NSDictionary *)dict {
if (![dict isEqual:returnSelection]) {
returnSelection = dict;
NSIndexPath *indexPath = [dict objectForKey:@"indexPath"];
id newValue = [dict objectForKey:@"object"];
[tasks replaceObjectAtIndex:indexPath.row withObject:newValue];
[self.tableView reloadRowsAtIndexPaths:[NSArray arrayWithObject:indexPath] withRowAnimation:UITableViewRowAnimationAutomatic];
}
}
+++++++++++++++++++++++++++++++++++++++
DetailViewContoller.h 要設 id delegate;
DetailViewController.m
//接收root傳來的值
- (void)viewDidLoad
{
[super viewDidLoad];
NSString *voc = [mySelection objectForKey:@"object"];
}
//回傳到root:
- (void) viewWillDisappear:(BOOL)animated {
[super viewWillDisappear:animated];
if ([delegate respondsToSelector:@selector(setReturnSelection:)]) {
//finish editing
[textView endEditing:YES];
//prepare selection info
NSIndexPath *indexPath = [mySelection objectForKey:@"indexPath"];//回傳到正確的Cell Row
id object = textView.text;
NSDictionary *returnSelection = [NSDictionary dictionaryWithObjectsAndKeys:indexPath, @"indexPath", object, @"object", nil];
[delegate setValue:returnSelection forKey:@"returnSelection"];
}
}
*******************************************************
********************************************************
Xcode 的樣板
這裡的 data 只是單存的 array:
- (void)prepareForSegue:(UIStoryboardSegue *)segue sender:(id)sender
{
if ([[segue identifier] isEqualToString:@"showDetail"]) {
NSIndexPath *indexPath = [self.tableView indexPathForSelectedRow];
NSDate *object = [_objects objectAtIndex:indexPath.row];
[[segue destinationViewController] setDetailItem:object];
}
}
iOS - Keyboard resigns
iOS 離開textField,按背景時,鍵盤降下 Keyboard resigns
//Did End On Exit 輸入完畢時鍵盤降下
//Did End On Exit 輸入完畢時鍵盤降下
- (IBAction)textFieldReturn:(id)sender { //這裡的sender應該是keyboard
[sender resignFirstResponder];
}
//Touch Down 按背景時,鍵盤降下
- (IBAction)backgroundTouched:(id)sender { //這裡的sender應該是背景
[_tempTextField resignFirstResponder];
}
iOS6 - Seque btw 2 View Controllers
iOS6 使用 Segue 傳輸兩個View Controller 之間的字串資料
Storyboard的設定:
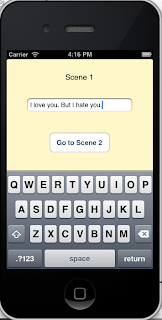
在Scene1 的 TextField 輸入字串 "I love you." 按下按鈕,資料將傳到 Scene 2 的 TextField. 如下圖:
分別為這兩個ViewControllers建立兩個Classes,如下:
--------------------------------------------------------------
SceneOneViewController.h:
#import <UIKit/UIKit.h>
@interface SceneOneViewController : UIViewController
@property (strong, nonatomic) IBOutlet UITextField *SceneOneTextField;
@property (strong, nonatomic) NSString *textOne;
@end
___________________________________________
SceneOneViewController.m:
#import "SceneOneViewController.h"
#import "SceneTwoViewController.h"
@interface SceneOneViewController ()
@end
@implementation SceneOneViewController
- (void)viewDidLoad
{
[super viewDidLoad];
// Do any additional setup after loading the view, typically from a nib.
}
- (void)didReceiveMemoryWarning
{
[super didReceiveMemoryWarning];
// Dispose of any resources that can be recreated.
}
//Pass data in scene one to text in scene 2
- (void) prepareForSegue:(UIStoryboardSegue *)segue sender:(id)sender {
SceneTwoViewController *destination = [segue destinationViewController];
destination.text = _SceneOneTextField.text;
}
//Receive data from scene 2 and display in scene 1; the value of var "textOne" should be set in scene 2.m
- (IBAction)returned:(UIStoryboardSegue *)segue {
_SceneOneTextField.text = _textOne;
}
@end
注意:在Storyboard的Scene2 Controller 裡,將按鈕連到下方綠色的小方格(Exit),選擇上述的 IBAction: returned。讓它離開Scene2回到Scene1時,要執行這個動作,如下:
________________________________________________
SceneTwoViewController.h:
#import <UIKit/UIKit.h>
@interface SceneTwoViewController : UIViewController
@property (strong, nonatomic) IBOutlet UITextField *SceneTwoTextField;
@property (strong, nonatomic) NSString *text;
@end
SceneTwoViewController.m:
#import "SceneTwoViewController.h"
#import "SceneOneViewController.h"
@interface SceneTwoViewController ()
@end
@implementation SceneTwoViewController
- (id)initWithNibName:(NSString *)nibNameOrNil bundle:(NSBundle *)nibBundleOrNil
{
self = [super initWithNibName:nibNameOrNil bundle:nibBundleOrNil];
if (self) {
// Custom initialization
}
return self;
}
- (void)viewDidLoad
{
[super viewDidLoad];
_SceneTwoTextField.text = _text;
}
- (void)didReceiveMemoryWarning
{
[super didReceiveMemoryWarning];
// Dispose of any resources that can be recreated.
}
//Pass the data from scene 2 to textOne
- (void) prepareForSegue:(UIStoryboardSegue *)segue sender:(id)sender {
SceneOneViewController *destinationVC = [segue destinationViewController];
destinationVC.textOne = _SceneTwoTextField.text;
}
@end
訂閱:
文章 (Atom)


